PLAN THE RIDE BUILD THE ROUTE
FROM GPX TO GPS


[1] THE GPX FILE
The GPX file is a text file using an XML scheme to describe GPS data (see the Wikipedia reference).
Topografix maintains the GPX 1.1 XML scheme documentation that can be found here.
ExpertGPS is a good software to visualize, edit and analyze the content of your GPX file in every detail.
A GPX file can contain 3 types of information:
- waypoints (tag <wpt>)
Waypoints provide points of interest to GPS software and devices.
- routes (tag <rte>)
Each route is defined by the sequence of route points (tag <rtept>).
A GPS software or device calculates the path to undertake between the route points based on its preference settings (ex. fastest, curvy, shortest, avoid highways,...) and based on the road condition and traffic information if available. Thus, the calculated routes will likely be different between two software or devices as their settings and algorithm and calculation methods may differ. In other words, it is important that the route contains all the route points that matter.
Most devices support two types of route points: shaping points and via points.
While the route will go across both types of points, the GPS device will typically provide information (distance/time to) about the next waypoint. A shaping point is simply a "pass by here", and a waypoint identifies a specific next milestone, stop or viewpoint.
- tracks (tag <trk>)
Tracks are made of track segments (tag <trkseg>) themselves made of a sequence of track points (tag <trkpt>). Most GPS devices can be used to record the track(s) of your journey, hiking, ride. A GPS coordinate is recorded at every 10 seconds, or minutes,... depending on the device settings. Thus a track point typically includes a timestamp metadata information associated (tag <time>). A track is the Tom Thumb's Stones to later retrieve the way done, or for others to follow your exact path.
Some software allows sampling the calculated routes to generate a track with more or less density. Tracks are also useful to follow a far-off-road itinerary while the GPS device has no map information to calculate a route - or will calculate the route using an unwanted detour... It is also possible to create a route from a track, i.e. so that a path is then calculated between successive track points. Sure, if the track is made of thousands of points, this might not be the most efficient way to use a GPS device...
Finally, each point (waypoint, route point, track point) is first of all defined by its geolocation information expressed by at least a latitude (attribut lat), a longitude (attribut lon) and, optionally, an elevation (tag <ele>).
The following file "Sample Montreal - Quebec.gpx"(click to download) is a very simple GPX that contains:
-
Two points of interest named POI1 and POI2, with their respective metadata (colour, symbol, description)
-
A first route, from Montreal to Quebec, is made of 5 route points: a starting point, a shaping point, a via point, a shaping point, and a destination point.
-
A second route, from Montreal to Sherbrooke, simply consisted of a starting and end point. The GPS device will be free to pick the optimal path upon its preferences and traffic info.
-
Two tracks, each track beings made of 2 track segments.
You can open the file into a text editor to look at the structure, and load it in ExpertGPS or import it using the online Kurviger.com planification tool to visualize its content.
[2] BUILD THE ROUTE
To build the route, I use Google Maps to find the address or geolocation of the key waypoints to pass by (viewpoints, points of interest, destinations,...) during the trip in combination with the fantastic online Kurviger.com tool to plan and build the route. It is also possible to use Google MyMaps - but steps to generate a GPX can be cumbersome (see a solution here), unless you use ExpertGPS to import the KML file to make it a GPX, etc.
Kurviger is designed first and foremost to build motorcycle trips - with including information about paved and unpaved ways. Each route section (between two successive way or shaping points) can be customized to piecewise calculate the fastest, curviest, off-road, etc... path. The route can be then exported into a GPX file containing routes and/or tracks with more or less sampling density. Kurviger also supports importing a GPX, including in superimposed mode to use it as a layer.

In this example of a route built using Kurviger, we start from the start point, calculate a fast route towards via point 1, then calculate curvy routes in the direction of the shaping point 2 then another curvy route to the destination point.
The unpaved section - such as a gravel road - is clearly observable in brown on both the map and the altitude diagram.
Most of the time I make a single GPX file for each trip day. If doing a special circuit in a region in a day, I will create several files such as a first itinerary to fast join the location, a second GPX file with a very detailed ride, and then a last itinerary to reach the camping or home. The first and last GPX will contain the minimum number of waypoints, leaving the GPS the most freedom to decide the fastest route to reach the objective. The second GPX file will be made of many shaping points to follow a specific ride - or could even be a track if is an off-road trail deep in the wood.
[3] EXPORTING THE GPX FILE
For most trips, I build the route with sufficient important via points and shaping points - with more shaping points in the sections for which I want the GPS to be very constrained in its route calculation, i.e. avoid any unwanted detour.
Don't forget! The route calculated by Kurviger in between two points will not be necessarily the same decided by your GPS! Thus adding judicious via and shaping points is important to get the expected ride.

In this example, more shaping points have been added to ensure I get the off-road trip I am looking for.
Then, I export a GPX file that contains the waypoints, the route and a track with a low sampling (few) of points.
As an alternative, I can let Kurviger generate a route down to my destination, such as a curvy one, and then export it as a track with a high sampling density that the GPS will follow point by point.

[4] VIZUALIZE & EDIT (optional)
Not mandatory, but I personally like to either re-load the exported GPX file into Kurviger, load it into ExpertGPS to check its structure. Unlike Kurviger, ExpertGPS do not calculate routes but display the content of the GPX as it is. A route will be displayed as a polyline (in blue below) and the distance of the trip will thus be (a lot) under-estimated.

[5] IMPORT THE GPX FILE
Let now import this simple GPX file "Sample Montreal - Quebec.gpx" into the GPS environment!
-> Importing the file for Tomtom
We use TomTom MyDrive (https://mydrive.tomtom.com/) to import the GPX file.
Once loaded, we can see our four individual track segments (and not the tracks) and our two routes extracted.


While the tracks can be synchronized right away with the GPS device (i.e. TomTom Rider) via the cloud, the routes must be first completed: select a track then TomTom calculates the routes between the route points, edit if needed to adjust or add shaping and via points, then save. Now the route can be synchronized with the device. And remember, here too the calculated route you see on TomTom MyDrive will not necessarily be the same during the trip (road condition, traffic, settings, calculation method) on your TomTom device!!
-> Importing the file for Garmin
Similar to TomTom, it is possible to upload and synch with the GPS device a route using Garmin Explorer (https://explore.garmin.com) from the desktop and from the mobile app, however I personally prefer importing, organazing and synching my GPS files using the PC desktop application Garmin BaseCamp.
See this Garmin page for the Garmin loading/synching options.
If importing the same simple "Sample Montreal - Quebec.gpx" GPX file into BaseCamp, I will first create a [new List Folder] under [My Collection] for my trip project, then I drag and drop my GPX file in it.
Then by selecting the project folder, I can clearly observe the loaded content of the GPX file, i.e. my 2 POIs, 2 tracks and 2 routes, with nice distinctives icons. It is possible to double click one of the item to get more detailed information, but also to change some attributes such as its color - and this will be used by the Garmin GPS device! Also you can clearly notice that the route does not get calculated in BaseCamp until you select the route and ask its recalculation (select and double click a route then recalculate - and don't forget to pick the appropriate routing profile).

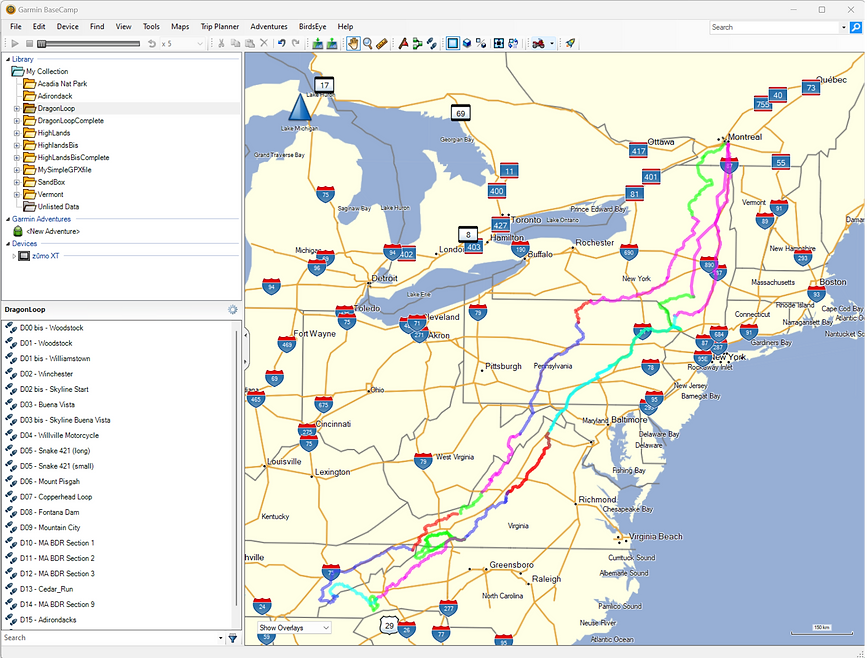
Below is an example of a more complex project made of multiple routes and tracks, each having a color attribute to visualize each day-trip distinctively:
Here is (in french) a nice series of tutorials by Mylene Noel regarding BaseCamp.
You may also enjoy using a topographic map for BaseCamp and Zumo. See here or here for some options.
[6] TIME TO LOAD THE GPX INTO THE GPS
-> Loading into Tomtom Rider GPS device
Once synchronized with the device, the tracks and routes can be found in the TomTom Rider GPS.
Go in the "My Routes" to retrieve our 4 tracks and 2 routes. You can then pick one of them to be the ride.
The route calculation will be based on the device parameters (fastest, shortest,...) and road conditions if available.


-> Loading into Garmin Zumo XT GPS device
We first load the files into the device: connect the Garmin Xumo XT to the PC then, in BaseCamp, drag and drop the files into the device folder. I personally prefer to drop the files into an added memory card and keep the internal memory only for the device firmware and map updates. So I drop the GPX files into the Xumo XT "Memory Card" -> "User Data" directory - as illustrated below. It might be preferable as well to drop only the route or track component.
Unfortunately... there is no file structure possible (or I did not find how to do this... email me if you know!!) so all the files are flat listed in the Zumo drive... Which is sad. Thus, I strongly recommend to well prefix and number the files to easily identify and navigate them in the device.

It is now time to get into the Garmin Xumo XT to use our GPX files.
How to use tracks:


How to use routes:


[7] IN SUMMARY
-
Use Kurviger to prepare the trip because it is dedicated to moto-trip, easy to use, very detailed and it calculates the routes with different modes, shows the elevation, shows the off-road sections, offers many map styles, can be used to superimpose an existing GPX, export tracks and routes with options, store projects in an account on the cloud, etc... and is GPS device manufacturer agnostics. Still, all the preparation can be done in TomTom MyDrive or Garmin BaseCamp.
-
Privilege building routes: this allows the devices to pick best route strategy, to account for traffic, however add as many as shaping points and via point as needed to get the desired trip.
-
Build detailed tracks only if you are looking to follow a very specific trail, especially for off-road / off-map adventure.
-
Name (prefix, number) your files and routes and tracks to easily retrieve them in the devices.
-
Export routes and tracks of the trip. Load them in the GPS sooner than later, and verify them in the device as the device re-calculates the itineraries with its own logic and parameters.
-
Optionally use both routes and tracks for a same itinerary: Garmin Xumo XT can follow a route superimposed too tracks. If the calculated route gets via a detour far from the track (i.e. an off map section) you can then temporarily ignore the route and keep going along the track indications! See the video here and for a Garmin display scheme here for more information - but sadly, to get a track in underlay in the display, you must add it into a collection in your Garmin Explorer account, then select the said collection as a layer in the display option of the Garming Xumo (see here).
[8] MAKE A ROADBOOK (bonus)
Roadbooks are definitely for adventure rallies and aim to provide the navigation information without GPS, but with a sequence of instructions (distance, direction, symbols) printed on a paper roll mounted on a holder. The graphics used in a roadbook are standardized (see here) and a summary can be found here.
And there is a tool, Rally Navigator (https://www.rallynavigator.com/), to speed-up build a roadbook from a GPX file.
On a long roadtrip, you may already put major instructions, view point reminders, key steps of the day... on a paper displayed in the clear window of the tank bag... but you may enjoy divert the use of a roadbook for the same purpose. A bit overkill, but it's all about having fun :)
Below is our simple Montreal to Quebec route loaded! I leave it here :)

RESOURCES:
-
The TomTom Rider Project: https://roadrider.jouwweb.nl/
-
The TomTom POI files: https://tomtom.gps-data-team.com/
-
The Garmin Theme Editor: https://www.pinns.co.uk/osm/theme_editor.html
-
The Garmin Zumo users forum: https://www.zumouserforums.co.uk/app.php/ZXT-P02
-
A great resource: everything you need to know about Basecamp, and the Zumo, etc, and all the great trick on how to place via and shaping point to avoid undesirable GPS effect: https://www.zumouserforums.co.uk/viewtopic.php?t=1464